

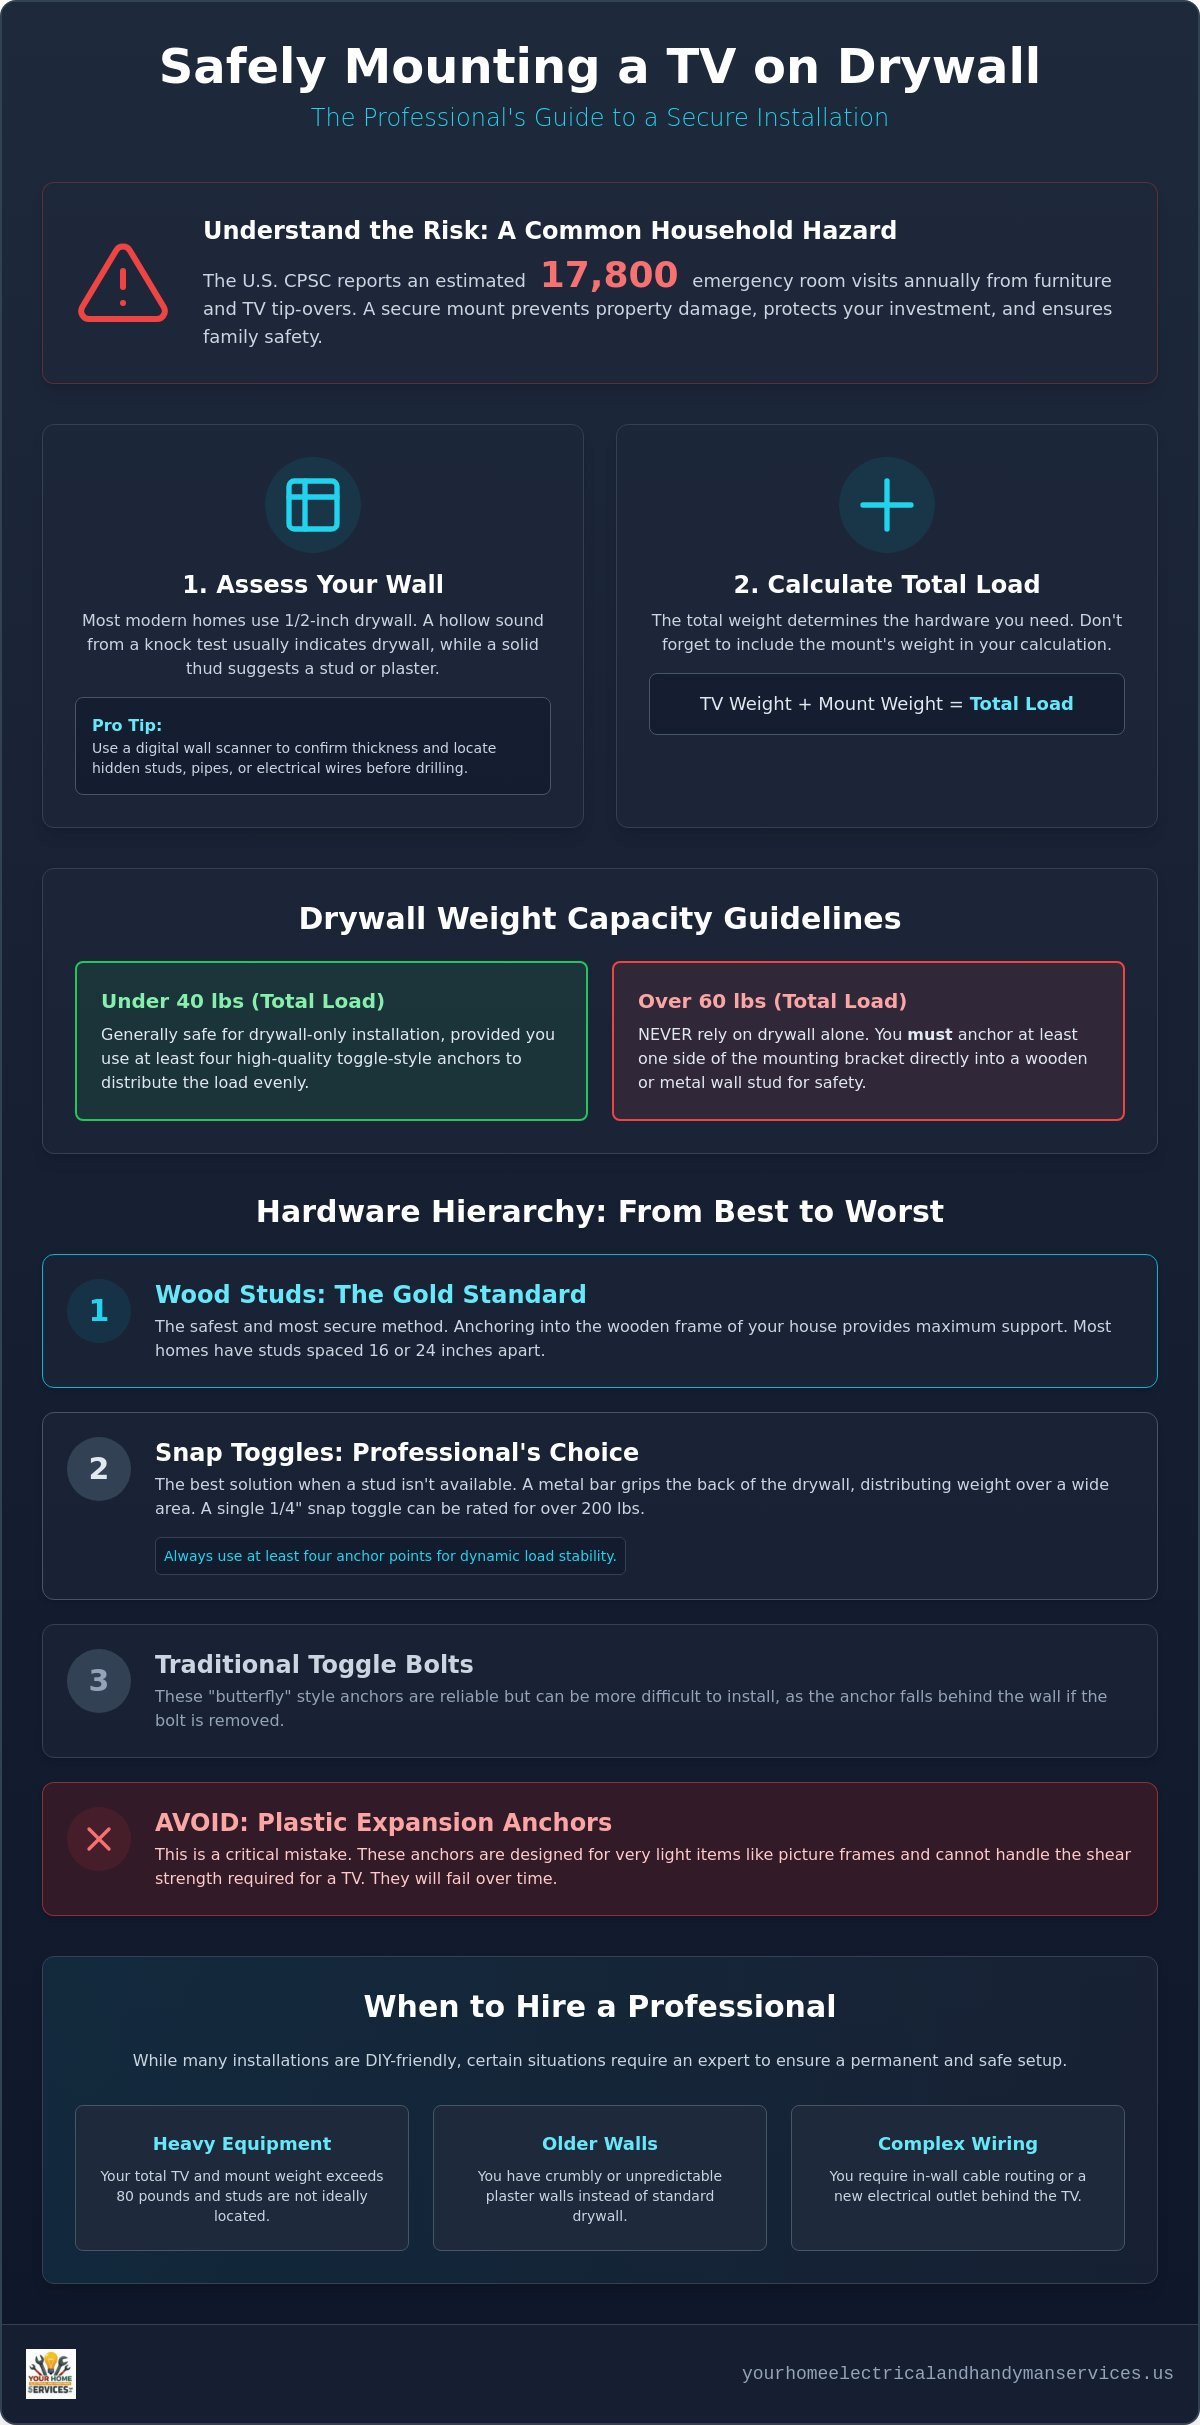
Did you know that the U.S. Consumer Product Safety Commission reports an estimated 17,800 people are treated in emergency rooms every year for injuries related to furniture and TV tip-overs? It’s a staggering number that explains why so many homeowners feel a sense of dread when they prepare to mount TV on drywall. You want the modern, clean look of a wall-mounted screen, but you don’t want to risk property damage or a broken investment because of a weak anchor or a missed stud.
We understand that the variety of hardware options can be confusing, especially when you’re worried about hitting electrical wires or causing the drywall to crumble. This 2026 guide provides the professional techniques and hardware specifications you need to secure any television with total confidence. You’ll learn how to achieve a perfectly level mount and manage cables safely behind the wall for a professional finish. We are going to walk you through the structural requirements for different TV sizes so you can finally enjoy your home theater with complete peace of mind that your mount is permanent and secure.
Key Takeaways
- Learn how to evaluate your wall’s weight capacity and why proper weight distribution is the secret to a successful installation.
- Identify the specific high-strength hardware required to safely mount TV on drywall when a wall stud isn’t perfectly positioned for your layout.
- Discover how to accurately map your wall for both studs and hidden electrical lines to prevent dangerous utility strikes and property damage.
- Understand the critical difference between surface-mounted cord covers and in-wall routing to ensure your home theater remains code-compliant.
- Recognize the specific scenarios, such as crumbly plaster or complex wiring needs, where calling a professional ensures a permanent and secure setup.
Can You Safely Mount a TV on Drywall? (Understanding the Limits)
Yes, you can mount TV on drywall safely, provided you understand the structural limitations of your home. While the ideal scenario involves anchoring into wooden studs, modern hardware allows for secure installations directly into the gypsum board. This process relies on specialized fasteners that grip the back of the wall panel rather than just the surface. Gravity is a constant force. If you use the wrong hardware, the weight will eventually cause the drywall to crumble or tear. By using different types of drywall anchors like toggle bolts, you distribute that weight over a larger area of the wall.
The science behind a successful mount focuses on “shear strength.” This is the amount of force a fastener can withstand in a downward direction before the drywall fails. For a wall-mounted TV, gravity is pulling the unit down parallel to the wall. Professional installers prioritize hardware that maximizes this shear strength. In 2026, most mid-sized LED and OLED televisions are light enough for this method, but larger screens require a much more calculated approach to avoid property damage.
Determining Your Wall Type and Thickness
Most homes in Richmond and Katy built after 2000 use standard 1/2-inch gypsum board. This material is predictable and strong enough for many mid-sized displays. You can identify your wall type with a simple “knock test.” A hollow, echoing sound indicates drywall, while a dull, solid thud suggests plaster or a stud. For a more professional approach, use a digital wall scanner to confirm the thickness and find any hidden obstructions. Knowing your wall thickness is vital because it determines which toggle bolts will actually deploy correctly behind the board.
TV Weight vs. Drywall Capacity
Before you start drilling, you must calculate the total load. This includes the weight of the TV itself plus the weight of the mounting bracket. While modern screens are lighter than ever, a large 75-inch screen can still exceed safe limits. Generally, if your total setup weighs more than 60 to 80 pounds, you should never rely on drywall alone. For a standard 1/2-inch drywall sheet using four high-quality toggle bolts, the maximum safe load should not exceed 40 pounds to ensure long-term stability without wall fatigue. If your equipment exceeds this weight, you must anchor at least one side of the bracket into a wall stud.
Choosing the Best Hardware: Anchors vs. Studs
When you decide to mount TV on drywall, the hardware you choose is the only thing standing between a perfect home theater and a shattered screen on the floor. Many homeowners reach for the plastic expansion anchors that often come in the box with the mount. This is a critical mistake. Plastic anchors work by creating friction against the sides of a hole. While they are fine for lightweight pictures, they cannot handle the constant downward shear and outward tension of a heavy television. Over time, the vibration and weight will cause the plastic to slip or the drywall to compress, leading to a catastrophic failure.
To ensure a permanent and safe installation, follow this hierarchy of hardware reliability:
- Wood Studs: The gold standard for structural support in residential homes.
- Metal Studs: Common in modern apartments; these require specialized self-tapping toggles.
- Snap Toggles: The best professional-grade solution when studs are not positioned correctly.
- Traditional Toggle Bolts: Reliable butterfly-style anchors, though they are more difficult to install than modern versions.
The Power of the Snap Toggle
Professional handymen almost exclusively use snap toggles when a stud isn’t available. Unlike traditional butterfly anchors that fall behind the wall if you remove the bolt, snap toggles use a solid metal bar held in place by a plastic guide. This bar rests flat against the back of the gypsum board. This distributes the load across a much wider surface area of the drywall. A single 1/4-inch snap toggle can be rated for up to 265 lbs in standard 1/2-inch drywall. However, we always use at least four points of contact to account for the dynamic force of moving the TV. This level of security is vital for preventing TV and furniture tip-overs in homes with children or pets.
Finding Studs in Texas Homes
In Richmond and Katy, most residential construction follows 16-inch or 24-inch stud spacing. Finding these wooden supports is the safest way to mount any display. Use a high-quality stud finder and mark the center of the stud, rather than just the edge. If your studs are off-center from your ideal viewing position, you can often anchor one side of the bracket into a stud and use snap toggles for the other side. If you end up making too many “test” holes while searching for the wood, you may need professional drywall repair Katy TX to restore your wall’s finish.
Before you start, gather a power drill, a bubble level, and a reliable stud finder. Accuracy is everything. If the process feels overwhelming or your wall material seems brittle, our team provides expert TV wall mounting to ensure your expensive display is perfectly secure and level.
Step-by-Step Guide to Mounting Your TV on Drywall
When you are ready to mount TV on drywall, a methodical approach ensures the job is done right the first time. Precision at every stage prevents unnecessary holes and protects your home’s infrastructure. Follow these professional steps to achieve a secure and aesthetically pleasing installation.
Step 1: Determine the Ideal Viewing Height
One of the most common mistakes homeowners make is mounting the screen too high, often referred to as “TV over the fireplace” syndrome. This leads to significant neck strain over time. For the best experience, the center of the screen should be at eye level when you are seated. Usually, this is about 42 inches from the floor, though it varies based on your furniture height.
Step 2: Map the Wall for Studs and Utilities
Before drilling, you must know what is behind the gypsum board. Use a stud finder to locate the vertical supports. Equally important is checking for hidden utilities. Electricity and plumbing often run behind the walls in Richmond and Katy homes. Use a non-contact voltage tester or a high-end wall scanner to ensure you aren’t about to drill into a live wire or a water pipe.
Step 3: Level the Bracket and Mark Pilot Holes
Hold the wall plate against the wall at your chosen height. Use a pencil to mark the exact center of the mounting holes. Accuracy here is vital. If your marks are even slightly off, the bolts will struggle to align with the bracket, creating unnecessary tension on the drywall.
Step 4: Install the Anchors and Secure the Wall Plate
Drill your pilot holes based on the hardware you selected in the previous section. If you are using snap toggles, insert the metal channel through the hole and pull the straps tight before snapping them off. Bolt the wall plate to the wall, ensuring it is tight enough that there is no movement when you pull on it.
Step 5: Attach the TV and Perform a Stress Test
With the help of a second person, lift the TV and hook it onto the wall plate. Before you let go completely, perform a gentle “stress test” by applying a small amount of downward pressure to the bracket. This confirms the anchors are fully seated and the wall is holding the load as expected.
The Importance of a Level Install
A 75-inch screen will exaggerate any imperfection in your measurements. Even a 1/8-inch tilt is visible from across the room. We recommend using a 4-foot level to check the bracket rather than the small, unreliable levels often included in cheap mount kits. If you find the mount is slightly off after tightening, many modern brackets have “post-install leveling” screws that allow you to make micro-adjustments without redrilling the wall.
Safety Checks and Clearance
Ensure the bracket sits perfectly flush against the wall. If there is a gap, the TV creates a “leverage pull” that exerts significantly more force on the anchors than the weight of the TV alone. Check the tilt mechanism to ensure it is locked and stable. Once the screen is secure, you may want to look into furniture assembly Sugar Land TX to set up a media console or shelving unit below the TV to complete your entertainment center.
Beyond the Bracket: Cable Management and Power Safety
Once you successfully mount TV on drywall, the visual appeal of your new setup often depends on how you handle the “cable waterfall” hanging from the screen. While plastic surface-mounted cord covers are a quick fix, they rarely provide the high-end look most homeowners desire. True professional concealment involves routing cables through the wall cavity. However, this step introduces significant safety considerations that go beyond simple aesthetics. You must distinguish between low-voltage signal cables and high-voltage power lines to protect your home from fire hazards.
A common but dangerous DIY mistake is running a standard TV power cord directly through a hole in the drywall. This is a direct violation of the National Electrical Code (NEC). Standard power cords are not rated for the heat levels or fire-spread risks present inside a wall cavity. If a fire occurs, insurance companies may deny claims based on this non-compliant wiring. To do this safely, you must either use a “Power Bridge” kit with in-wall rated wiring or have a recessed outlet installed directly behind the display. For your signal cables, ensure you only use HDMI and coaxial lines with CL2 or CL3 ratings, which are specifically designed for safe in-wall use.
Code-Compliant In-Wall Wiring
Achieving a truly “floating” TV look usually requires a licensed electrician to install a recessed outlet. This allows the TV to sit flush against the wall without the plug pushing the screen forward. In Richmond and Katy, local building codes are strict about internal power modifications. Our team handles both the physical mounting and the licensed electrical work needed for code-compliant power relocation. This expertise is also useful if you decide to enhance your viewing area with custom lighting installation services to reduce eye strain during movie nights.
Integrating Smart Home Devices
Modern entertainment centers often involve more than just a screen. You may need to mount an Apple TV, Roku, or a soundbar alongside your television. When hiding these devices behind the screen, be mindful of Wi-Fi signal interference. A large metal TV chassis can act as a shield, weakening the connection to your streaming devices. Positioning these peripherals near the edge of the frame or using external infrared (IR) blasters ensures your remotes and networks function perfectly. If you are building a complex ecosystem, our smart home device setup in Sugar Land can help integrate your theater with the rest of your automated home.
Don’t risk a fire hazard or a cluttered look with messy wiring. If you want a clean, professional finish with code-compliant power concealment, contact us for expert TV wall mounting and electrical setup today.
When to Hire a Professional Handyman in Richmond or Katy
Even with the right anchors and a steady hand, some wall conditions present challenges that go beyond a standard DIY project. If your home features older lath and plaster or the unusually thin 1/4-inch drywall found in certain Fort Bend County renovations, the structural integrity of the wall surface is often unpredictable. Attempting to mount TV on drywall in these scenarios can lead to the board crumbling or “blowing out” behind the bracket. Professionals have the experience to identify these weak points and use structural bridging techniques that standard toggle kits simply cannot offer.
Complex cable routing is another primary reason to seek expert help. If your wall contains fire blocks, horizontal framing, or dense insulation, fishing wires to a lower outlet becomes a significant labor challenge. Furthermore, if you are installing a high-end OLED or a screen larger than 75 inches, the sheer weight and fragility of the unit make it a high-stakes task. A professional “No-Fall Guarantee” ensures that your investment is safe, removing the stress of potential property damage or a shattered display.
Expert TV Mounting in Fort Bend County
Your Home Electrical and Handyman Services LLC is the trusted choice for Richmond and Sugar Land homeowners because we combine structural expertise with licensed electrical skills. We don’t just hang a bracket; we evaluate the entire mounting site to ensure it meets modern safety standards. This holistic approach includes verifying that your wall can handle the long-term tension of the mount. For those building a dedicated media room with high-power requirements, we can also perform a professional electrical panel upgrade Richmond TX to provide a clean, dedicated circuit for your theater components.
Ready for a Flawless Home Theater?
Professional installation provides a level of precision that is difficult to achieve alone, from perfectly centered alignments to code-compliant power concealment. You gain the peace of mind that comes from knowing your home theater is secure, level, and built to last. We invite you to book a same-week appointment for professional TV mounting in Katy or Rosenberg to transform your living space with total confidence.
Schedule your professional TV mounting service today!
Enjoy Your Ultimate Home Theater Experience
Achieving a professional look in your living room requires more than just a drill and a bracket. Success depends on understanding the structural limits of your home and selecting high-strength hardware to distribute weight effectively across the wall surface. By prioritizing National Electrical Code standards and following the safety principles outlined in this guide, you can protect your investment and your property. Whether you are setting up a slim OLED or a massive display, the decision to mount TV on drywall should always be guided by precision and long-term stability.
If you prefer to leave the technical details to the experts, Your Home Electrical and Handyman Services LLC is here to help. We have provided 5-star local handyman services to Katy, Sugar Land, and Richmond since 2021. Our team includes licensed Texas electricians who specialize in both structural mounting and code-compliant electrical work. Take the guesswork out of your home theater project and enjoy the peace of mind that comes with a permanent, level installation. We look forward to helping you create a safe and beautiful viewing space for your home.
Get a Professional TV Mounting Quote for Your Richmond Home
Frequently Asked Questions
Can I mount a 75-inch TV on drywall without a stud?
No, you should not mount a 75-inch TV on drywall without a stud. These large displays often weigh between 70 and 100 pounds, which far exceeds the safe weight capacity of gypsum board. For screens of this size, you must anchor the bracket into at least two wall studs to ensure the installation is permanent and secure against the wall.
What are the best drywall anchors for a TV mount in 2026?
Snap toggles are the most reliable hardware for this task. Unlike standard plastic anchors, snap toggles use a solid metal bar that rests flat against the back of the wall. This design allows them to handle much higher shear loads. They are the preferred choice for professionals when a stud isn’t available for every single mounting point on the bracket.
How much weight can a 1/2 inch drywall hold for a TV?
Standard 1/2-inch drywall is generally rated to support a total load of 30 to 40 pounds when you
mount TV on drywall
using four high-quality toggle bolts. While individual anchors may have higher manufacturer ratings, the drywall material itself can fail if the weight is too concentrated. If your screen is heavier than this limit, you must anchor the system into the wooden framing.
Is it illegal to run a TV power cord behind the wall in Texas?
Yes, running a standard power cord inside a wall is a violation of the National Electrical Code (NEC). These cords aren’t rated for the heat levels found inside walls and can pose a significant fire risk. To hide wires safely, you need an in-wall rated power kit or a recessed outlet installed by a licensed electrician. This ensures your home remains safe and compliant.
What tools do I need to mount a TV on drywall myself?
You will need a power drill with various bits, a high-quality stud finder, a level, and a pencil. A socket set or a screwdriver is also necessary to tighten the lag bolts or toggles securely. Having a 4-foot level ensures your screen won’t have a visible tilt once the job is finished. Using the right tools prevents unnecessary damage to your wall.
How do I know if there are electrical wires behind where I want to mount my TV?
You can identify hidden electrical lines using a stud finder with an AC detection feature. These tools alert you to live wires behind the gypsum before you attempt to
mount TV on drywall
. It’s also helpful to look for existing outlets on both sides of the wall, as wires typically run horizontally or vertically from those points to reach the electrical panel.
What should I do if my drywall starts to crack during installation?
If you see cracks, stop drilling or tightening immediately. This indicates the drywall is too brittle or the anchor is creating too much tension for the board to handle. You should move the mount to a different position or use a mounting plate to bridge the weight across two studs. Professional drywall repair is usually required to fix the damage and restore the finish.
Do I need a special mount for a curved TV on drywall?
You don’t need a special mount, but you must use the correct spacers to ensure a secure fit. Most universal mounts include a variety of spacers that allow the bracket to sit correctly against the curved back of the screen. Ensure the spacers are long enough to provide a flat surface for the mounting arms to attach without putting stress on the TV casing.